
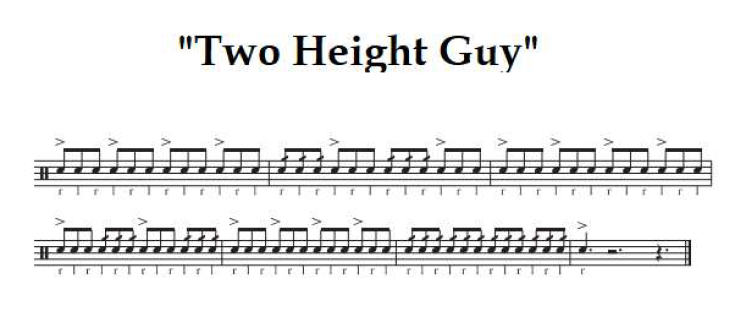
Here’s a simple triplet rolls exercise that I learned from several different teachers many years ago. Check out the video below for some variations that can help improve your sound quality and rhythmic consistency, and click here for printable sheet music.
Bucket Game - Splits Exercise for 2 Drummers
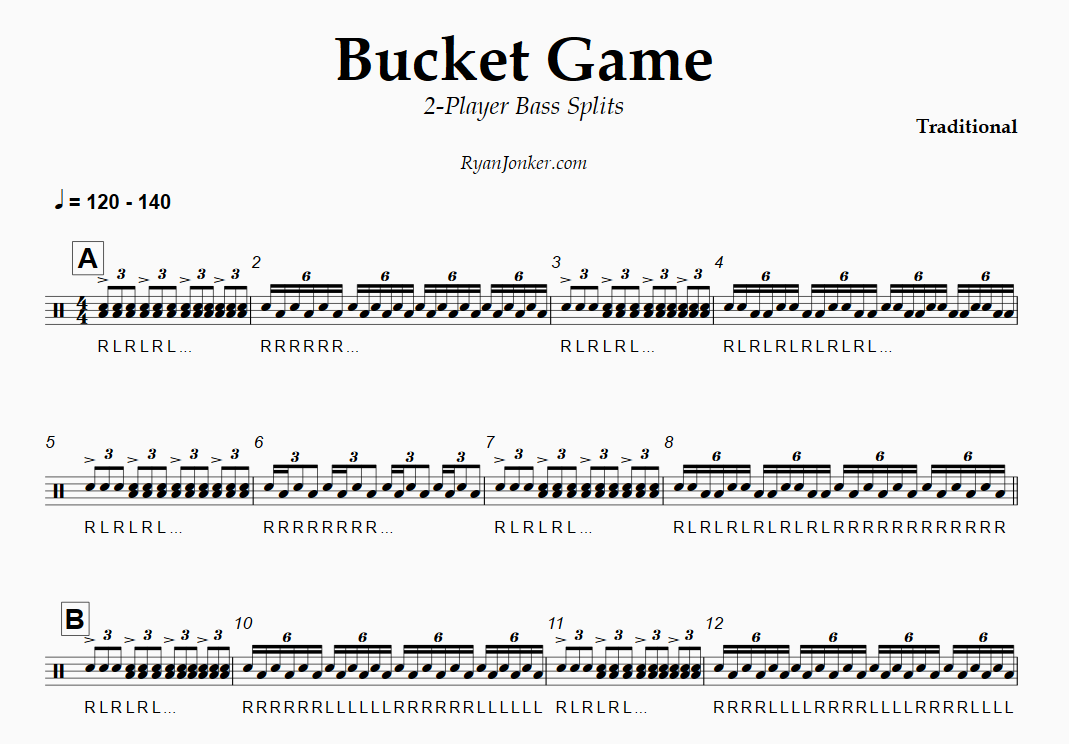
Here is a simple exercise called Bucket Game. It is primarily used by marching bass drummers to practice splitting rhythms between two people, but can be a good practice tool for any percussionist. I recommend starting with the top part, and practicing two bars at a time with the metronome. Once you have mastered A to B on the top part, try the bottom part two bars at a time (still with the metronome). Then find a buddy and have them do the same thing, and eventually split the rhythms. Once you both master both parts from A to B, move on to the next section.
Free PDF and video:
How to Write a Drumline Cadence
A cadence is a piece of music played by a drumline. It is usually used functionally as a way to keep time for the band as they are marching from point A to B, either during a parade or other live performance. Cadences are usually written to be fun to perform and fun to listen to. They often borrow rhythmic ideas from popular styles of music such as Afro-Cuban, Pop, R&B, and more. Sometimes, cadences are arrangements of a particular song, while others are original compositions. By reading this guide, you will hopefully get some ideas to inspire your next drumline cadence!
Practical Considerations

Think through these things before getting started. (Photo credit: James Scott)
Begin with some practical considerations. Will this cadence be performed during parades and/or while the drumline is moving? If so, consider keeping it within a comfortable walking tempo of around 108-124bpm. If not, you have much more flexibility when it comes to tempo.
Next, consider who will be performing this music. Is it for mostly beginners, very advanced performers, or somewhere in between? What skills does your target audience have in terms of rudiments, pulse control, and metric modulation abilities? Do you have any specific skills or rudiments you wish to focus on more heavily?
Notation

Capture your musical ideas by writing them down. (Photo credit: Weston MacKinnon)
Now it’s time to determine how you will notate the music. Will you write it by hand? If so, find some staff paper and a pencil. Will you use computer software? Sibelius, Finale, and MuseScore are some great options that each come with a learning curve. For someone just starting out, MuseScore may be the best in terms of cost (free) and ease of use. Learning how to notate music can be challenging at first, but it is worth it because it unlocks your creativity and allows you to express yourself musically.
Consider Restrictions

Restrictions can inspire creativity. (Photo Credit: Utsman Media)
Sometimes I find that I am the most creative when I have some type of restriction placed on my compositional process. Maybe it’s a self-imposed challenge, such as: “I am going to write an exercise using only paradiddles and double paradiddles.” Maybe it’s something as simple as a deadline beyond my control (“I have to finish the piece by tomorrow night so I can hand it out to the students on Monday”). Giving yourself a deadline or some type of restriction can serve to focus your attention and get creativity to flow. It’s up to you to decide if that makes sense for your current project.
Coming Up with Ideas

Make yourself available for inspiration. (Photo credit: Patrick Tomasso)
Sometimes an idea for a piece of music jumps out at you. This can happen at any time, so it’s best to keep a recording device with you. Luckily, most mobile devices have some type of voice recorder. This allows you to tap or sing the rhythmic idea into the recording to be notated later. Some of the best composers in the world use this method to keep track of new ideas.
Other times, you may need to look for an idea. This might mean listening to some of your favorite music. It might also mean listening to musical genres that you have never listened to before. Rhythm is everywhere. I recommend not listening to a bunch of other drumline cadences for inspiration. Instead, try to capture musical ideas from other genres and bring them to life in a new and unique way in the drumline idiom!
Notating Your Ideas

Capture your musical ideas by writing them down. (Photo Credit: Philipp Katzenberger)
Once you have a few musical ideas, it’s time to write them out. Most cadences are written out in three or four staves, with the top line being for snares, the next for tenors, then followed by bass drums, and finally cymbals. With your staves lined up, begin recording your ideas on the page. Try moving the rhythm from one voice to another (example: maybe you have an idea for a snare part… try repeating that idea in the tenor part). I like to put an idea down, then leave a bunch of blank measures before jotting down another idea. This gives me room to expand upon the idea, leave it and work on something else, and then come back to it later. The benefit of using computer software for this task is that you can easily cut and paste ideas around the score. A pair of scissors and tape could accomplish the same task with handwritten music.
Developing Your Ideas

Your ideas need to be shaped and refined. (Photo credit: Alice Dietrich)
So now your score has a bunch of ideas that don’t necessarily connect to each other in any meaningful way. If you like all of the ideas, then it’s time to find what does connect those ideas musically, and develop more similar content to bridge the gaps. This could be as simple as writing a 2-4 bar transition between two unrelated ideas, with the transitional material borrowing concepts from each idea. Or maybe your 2-4 bar transitional idea evolves into a new idea of its own and becomes a 16-bar phrase. Don’t be afraid to let your musical ideas grow where they want to.
If you have a good idea for one instrument, but not much going on in the other three parts, here are some ideas to help fill out your score:
· Consider making it a solo for that instrument, and just fill in some sparse accompaniment parts.
· Try copying the rhythm note-for-note into another instrument. For example, a tenor part that is in unison with the snare part rhythmically, but adds “rounds” (playing on different drums).
· Create counterpoint. Example: a snare part that moves from eighth notes to 16th notes could be paired with a tenor part that moves from 16th notes to eighth notes.
· When in doubt, introduce syncopation. For example: a snare part playing straight 16th notes would fit nicely overtop a dotted eighth and 16th note pattern in the bottom bass drum.
· Use repetition to reinforce your musical ideas. That being said, avoid repeating something too many times without introducing new material. Too many repetitions can get stale.
Continue developing your ideas until you reach a point where the cadence has a form. Musical forms that we learned about in theory class (AB, ABA, ABACA, etc.) can serve as a guide to give you structure. Some composers decide on this structure before finding and developing their musical ideas, so perhaps that is something you want to do as well.
Cleaning Up the Score
Make your parts and score look professional. (Photo credit: The Creative Exchange)
Now that you have created a solid draft of the piece, it’s time to clean it up. Think about each phrase from the performer’s perspective: if you were reading that part for the first time, how would you play it? Include sticking (“R” and “L”) under each note for snares, tenors, and bass drum unisons. Your performers may want to change a few stickings later, but at least you have given them a starting point.
The most important thing to do when cleaning up your score is to play your parts. It’s easy to sit behind a computer, listen to a virtual drumline play the music, and think “wow, that sounds great, I did a great job!” However, that’s not real life. If possible, get on actual drums and try your parts out. Yes, that means learning each individual split part for your bassline music (or at least sight reading it). You will be amazed at how many little changes you will want to make after actually playing through your parts. Do not skip this step!
Finally, make your score look good. That means the parts are readable, there are clear dynamic instructions for every instrument throughout, typos and errors have been found and fixed, and there should really be no questions for someone sight reading your music. Make your intent as a composer as clear as possible!
Getting Feedback

Feedback is how we grow. (Photo credit: LinkedIn)
Now it’s time to have a few trusted musician friends check out your score. If you are a snare drummer with little to no tenor/bass/cymbal experience, you should definitely have specialists on each of those instruments check out your parts. What you may think is easily playable might actually be awkward to play, even after you’ve play-tested it! A specialist can recommend ideas that might make the part ten times easier for the performer with generally the same musical outcome. You can preserve your creative ideas while also making the parts more playable, which goes a long way for having your performers actually enjoy playing the music you’ve created. Feedback is a big deal for the development of your piece, but an even bigger deal for your development as a composer and a musician.
Once you have some valuable feedback, make the edits, clean up your parts and score even more, listen critically a bunch more times, sleep on it, and then print it! Congratulations! That’s it. Now enjoy performing your piece!
If this guide has been useful to you, or you have questions or ideas to share, leave a comment or feel free to reach out. While you’re here, please consider purchasing some sheet music from the store. Thanks for reading!
How to Teach Drumline Auditions
This article is directed at anyone looking to teach a drumline for the first time. Maybe you are a band director and are looking for guidance, or perhaps you are the section leader of your drumline and have been tasked with teaching your peers. Hopefully this article can give you some tips to get started with your season and hold successful auditions. If you have questions after reading this, feel free to leave a comment below or reach out!
Getting Started

A marching band performs during pre-game (photo credit: Frankie Lopez)
Before your season begins, you need to take stock of your equipment and available personnel. How many serviceable drums do you own? What repairs, drum heads, sticks, carriers, and other pieces do you need to order? Are you just fielding a drumline, or will you have a front ensemble as well? Take care of business and get those items in stock. However many working instruments you own will dictate how many performers you can have on each instrument. Another consideration is to not use every single instrument you own (so you have a backup or two); or, if budget allows, consider buying extra instruments ahead of the season in time for workshops/auditions.
What about staff? Are you the only percussion instructor, or is there room in the budget to hire more staff? Maybe you can afford to have extra percussion staff at auditions and band camp, but not for the rest of the season. Or maybe your budget allows you to have a technician in front of every subsection for every rehearsal of the season! Whatever your budget allows for, I wholeheartedly recommend getting good staff members that are knowledgeable and care about your members’ education. Once you find those people, pay them well, communicate with them well, and they will stay with your program for multiple seasons and help you build your program up for the long-term. If it’s only you, consider adding car washes or other fundraisers to the season schedule to build up the budget for staffing next year!
Next, you need to think about your goals for the season. How many members do you expect to have this year? What is the current skill level of your performers? What do you hope to accomplish musically this season? What techniques and exercises do you need to focus on to achieve those goals?
If you aren’t sure what a good goal for your drumline might be, a solid understanding of tempo control and the 40 standard rudiments is a good place to start. If you are fielding a front ensemble, developing 4-mallet technique and learning all major and minor scales would build a solid foundation.
You will need a comprehensive exercise packet. Depending on the group, you may also need to purchase some drum cadences or stand jams. Finally, you need to consider who is writing the percussion music for your show, and get the writing process started!
Once you have those things ironed out, you can move on to the next step.
PLANNING WORKSHOPS & AUDITIONS
Workshops give your students a chance to try out new instruments in a stress-free environment. (Photo credit: Lone Star)
Give your potential members at least several weeks notice before holding drumline workshops. You should also make the exercises available to everyone early so they have time to learn the materials beforehand. Make it clear that the workshops are NOT auditions, and that prospective members are free to try out any instrument and even rotate instruments during the workshop! This can be a fun way to get students engaged and encourage more people to show up, especially for a younger group.
These clinics also allow you to see how each member might perform in each section. If you have members that are clearly more suited for one instrument than another, this is your chance to let them try other things out, but then help guide them towards their best fit. I’ve found that holding three workshops and three auditions back-to-back seems to be just the right amount of time to make important placement decisions. Here is a template for a potential workshop/audition schedule:
Monday, May 1, 6:00-8:00pm - Workshop #1
Wednesday, May 3 - 6:00-8:00pm - Workshop #2
Monday, May 8 - 6:00-8:00pm - Workshop #3
Wednesday, May 10 - 6:00-8:30pm - AUDITION #1
Monday, May 15 - 6:00-8:30pm - AUDITION #2
Wednesday, May 17 - 6:00-8:30pm - AUDITION #3
Once you have your exercises handed out and workshop/audition dates announced, one final consideration is to secure your rehearsal spaces. If you have enough staff to split up into all subsections (snare, tenor, bass, cymbals, front ensemble), then you will need that many separate rooms to rehearse in. Ideally, all of these rooms will have mirrors, but if only one room has mirrors, give it to the cymbal line. If you are short on spaces or staff members, you can keep the snares/tenors together and sub everyone else out. Or if you only have two staff members, put the entire drumline together, and the front ensemble in a separate room. If everyone needs to all be in the same room because it’s just you teaching, make sure your exercise packet is written to accommodate keyboards and drums playing together.
After all that planning, you will finally be ready for the next step.
RUNNING THE WORKSHOP

Give students lots of opportunities to ask questions during workshops. (Photo credit: Manuel Nägeli)
You’ve purchased the equipment, handed out the exercises, and scheduled the rehearsals… now it’s time for your first workshop!
How you proceed will depend on your available staff. Ideally you will have at least one staff member per subsection: 1 snare, 1 tenor, 1 bass, 1 cymbal, 1 front ensemble, and YOU moving around. Having the flexibility to move between rooms and take notes on how everything is going can really help you stay organized with a large percussion section. If it is just you on staff, you will have to take those notes and teach at the same time.
You need to plan each workshop ahead of time. Giving your staff members a breakdown of the schedule will help everyone stay on track and accomplish your goals… or if it’s just you, it will help you stay on track. Here is an example of a workshop schedule for a drumline:
5:45 - Members arrive, set up instruments
6:00 - Full percussion section meeting, introductions, give out name tags, talk about plan for the night
6:15 - Sectional rehearsals, teach how to hold sticks/mallets, work on “8 on a hand” and the four stroke types.
6:45 - Rotate instruments, teach how to play “Double Beat” and work on double stroke technique.
7:15 - Rotate, review the four stroke types, focus on accent tap (downstrokes and upstrokes)
7:45 - Full ensemble meeting, talk about how the night went, describe expectations for future workshops/auditions, answer questions, clean up
8:00 - Depart
This is just an example for a full drumline workshop rehearsal. For individual sectionals, it would be helpful to give your staff members a loose outline of what you want them to cover with their sections. Giving your staff enough leeway to make decisions (but also some structure to keep them on track) is a balancing act that is different for each staff member. As you get experienced with your people, you will learn what works and who needs more or less guidance.
Running the Audition

(Photo credit: Cleveland Browns)
As stated above, in the best case scenario you will have enough staff members to have someone running each sectional, leaving you available to float between rooms and take notes. This also frees you up to have individual conversations out in the hallway with prospective members while the group still rehearses. There will likely be a lot of individuals shifting around, so having yourself available to escort members between sections and introduce them to the new group can help make the transition smooth.
If someone isn’t working out on a particular instrument, don’t hesitate to let them know individually. If you have a balanced approach to building your percussion section, you will be able to explain the value of performing on another instrument. Remind your students that all percussion is connected, and time spent on one instrument can truly help someone prepare for other instruments. While a few students might be disappointed that they didn’t get their first choice, your honest explanation and pep talk towards trying a new instrument will go a long way. It’s worth remembering that some prospective members will quit if they don’t get what they want. Honestly, that’s ok. If someone isn’t willing to play as part of a team, they might not be the best fit for your team in the first place.
As far as running the auditions themselves, you should treat them very much like the workshops. The setting is basically like a normal rehearsal. Individual, one-on-one auditions can be a useful tool, but they tend to introduce a lot of stress to the prospective member. For a younger, less experienced group, I recommend sticking with the group audition format. You can still have individuals play 1-2 reps at a time in front of everyone (just like you might do in a rehearsal), but avoiding the “prepared solo” in a separate room by themselves is smart for a young group. For an older or more advanced group, or one with many auditionees for only a few spots, it absolutely makes sense to turn the pressure on and utilize individual auditions to get a feel for how that person performs. The situation will dictate which format is best; these are just ideas to consider and adapt to your own situation.
The last thing I would re-emphasize would be to run the audition like you will run a rehearsal. If your approach during the season will be very regimented and disciplined, help your prospective members understand what that will feel like from day one. If your style is more laid back, be consistent with that approach! Remember, your prospective members are auditioning you as well, deciding if they want to spend the next season working for you. Your preparation and dedication to the group will be apparent to each of them. Do your homework and be ready to teach, and they will appreciate you even more for it.
If you have any questions or comments, feel free to respond below or reach out. Thanks for reading!
The Difference Between a Marimba, Xylophone, Vibraphone, and Glockenspiel
Percussionists are responsible for playing so many different instruments. A basic understanding of the differences between them is crucial. Keyboard percussion consists of chromatic, melodic instruments with bars arranged in the same layout as a piano. By reading this guide, you will be able to identify each of the main keyboard percussion instruments and the differences between them.
(If you find this article useful, please consider purchasing some exercises and sheet music from the store!)
Marimba

This is a five-octave marimba. Notice the wide, wooden bars (brown rectangles on top) and the big resonators (black tubes on bottom).
The most distinguishing features of a marimba are it’s wide, wooden bars and it’s big resonators. The bars are usually struck with yarn or corded mallets with a rubber core. A good rule of thumb when selecting marimba mallets is to make sure that the material of the mallet is softer than the wooden bars themselves. One wrong strike with a hard mallet can mean a broken bar that will need to be replaced.
Marimbas come in a variety of sizes. The one pictured above is five octaves (C2 to C7). Most college percussion studios have at least one five-octave marimba, as lots of marimba literature is composed for five-octaves. High school programs generally have 4.3 octave marimbas (A2-C7), which covers most music written for band and orchestra. Marimbas come in other sizes as well.
Xylophone
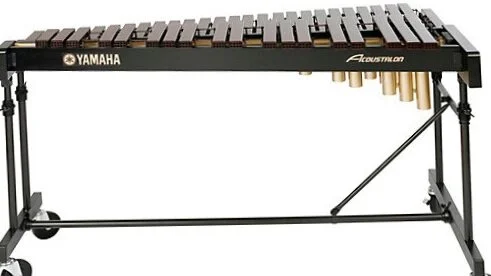
A 3.5 octave xylophone. Notice the bars are thinner than a marimba, and the resonators are smaller.
A xylophone is similar to a marimba in that it also has wooden bars. The primary difference would be that a xylophone is smaller in terms of range, bar width, and resonator size. This results in a higher pitched instrument with less resonance (in other words, the bars don’t ring as long after being struck). Xylophones are generally played with harder mallets than would be used on a marimba, but still soft enough as to not damage the wood.
It is worth noting that both marimbas and xylophones can be built with real wooden bars or with synthetic bars. Synthetic bars (as seen in this xylophone picture) approximate the same sound as the real thing, but are less expensive, more durable, and arguably more sustainable.
Vibraphone
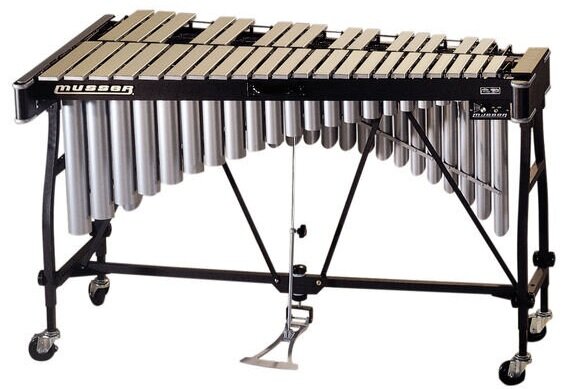
A three-octave vibraphone. Notice the metal bars and sustain pedal.
The first difference you will notice that distinguishes a vibraphone is the metal bars. The next thing you might notice would be the sustain pedal at the bottom of the instrument. This pedal, when depressed, allows all of the bars to ring. When the pedal is up, a felt pad presses against the bars from underneath, dampening the sound.
Vibraphones are characterized by their metallic, mellow sound. While marimbas are often played with yarn-wrapped mallets, vibraphonists often use cord-wrapped mallets. However, experimenting with either material on either instrument is encouraged, as long as the player is careful not to damage the equipment with mallets that are too hard.
One of the main new responsibilities for beginning vibraphonists to consider is note duration. Marimba and xylophone players (usually) only need to think about the initiation of their notes. Vibraphonists must also consider which notes they want to ring, which notes should be staccato (short), and everything in between. Phrasing as developed by your pedaling can make or break your sound on a vibraphone.
Glockenspiel (Bells)

A 2.8 octave glockenspiel. Notice the metal bars and the smaller size.
The last of the keyboard percussion instruments we will discuss is the glockenspiel. As you can see, the metal bars are similar to the vibraphone. The main difference is that the glockenspiel is in a much higher range than the vibraphone (in this case, F5-D8). Most glockenspiels do not have a sustain pedal, but some do.
It is worth noting that the glockenspiel sounds two octaves higher than written. In other words, if you see a C4 on the page, you will hear C6 when striking the instrument.
Many percussionists start out on a glockenspiel. The skills you learn as a beginner definitely translate to the other keyboard instruments. Spending time playing each instrument is really the best way to get to know how they operate and what makes each one unique.
Thanks for reading this guide! If you have questions or other knowledge to share with readers, please leave a comment below or reach out. Finally, while your here, check out some sheet music in the store!
How to Meet Your Goals
To begin answering this question, consider the following three objectives:
DEFINE YOUR GOAL
“A goal properly set is halfway reached.” —Zig Ziglar
What are you trying to accomplish? Maybe you are trying to learn a new piece, or perhaps you are trying to learn a new technique. A goal such as “just getting better” is not specific enough. Figure out what exactly your goal is, and then you can move on to the next step. Defining your goal might be very simple, or it might take some time. It’s OK to have more than one goal, but it is best if you can narrow those goals down to specific, achievable benchmarks that can be defined. Once you have your goal clearly defined, move on to the next step.
MAKE A PLAN

“Our goals can only be reached through a vehicle of a plan, in which we must fervently believe, and upon which we must vigorously act. There is no other route to success.” —Pablo Picasso
“Backwards Planning” is the best way to create an effective plan with the end goal in mind. For example, if you are trying to learn a piece to perform at a recital, start with the recital date. Determine other target dates to use as checkpoints along the way. Here is an example:
April 15 - Recital
April 1 - Perform for small group of friends/family
March 15 - Record yourself playing the entire piece
March 1 - Entire piece learned (at tempo)
February 15 - Entire piece learned (75% tempo)
February 1 - Second half of piece learned (50% tempo)
January 15 - First half of piece learned (50% tempo)
January 1 - Start
Notice how this plan is in reverse chronological order, meaning that we are keeping the end goal in mind as we create each checkpoint. This creates a sense of urgency (but not panic) all the way back in January 1, and more importantly, it provides focus along the way. Depending on the individual, a more specific plan may be called for. For our example above, maybe each day has a specific number of measures to learn. Here is a detailed breakdown for a piece that is 90-100 measures:
January 15 - First half of piece learned (50% tempo)
January 12 - Measures 30-40 learned (50% tempo)
January 9 - measures 20-30 learned (50% tempo)
January 6 - Measures 10-20 learned (50% tempo)
January 3 - Measures 1-10 learned (50% tempo)
January 1 - Start
Here, the “mini goal” (in this case, on January 15) is at the top of the list, and everything that follows is divided up to support that main goal. Taking the time to properly plan can keep you honest and on track towards meeting your end goal!
JUST DO IT

“The most dangerous distractions are the ones you love, but that don’t love you back.” — Warren Buffet
You’ve set your goal and made your plan. Now it’s time to just get it done. Get to work!
Stuff happens. Distractions get in the way. If you fall behind, you might get discouraged. Just remember that your plan has allowed for some flexibility, and while (in our example) the recital date might be non-negotiable, the other dates leading up to it are adjustable. In other words, if you fall behind in the beginning of February, you can catch up in the next two weeks. Stay after it.
Just remember that this can be the most challenging part. For some people, having a plan and sticking to it comes naturally. Others just don’t function that way. Regardless of who you are, it is worth setting goals, making plans, and working to accomplish them. Don’t get discouraged if things don’t go perfectly all the time; remember that every failure is a chance to learn and grow. Stay motivated, do your best to stay on track, and you will accomplish everything you set out to achieve.
How to Play More Musically
Teachers and instructors often tell their students to play “more musically,” but they do not always explain what that means exactly. Here are some concepts to focus on that can shed some light on this issue.
TONE

What does your instrument really sound like?
Tone is one of the most important aspects of music-making, and it refers to the quality of your sound. No matter what instrument you are playing, you can think of examples where someone playing it just sounded “bad.” Maybe they played all of the correct notes, and even used shaping and dynamics… but the experience of listening to them play was just not enjoyable.
We use lots of words to describe tone: warm, dry, rich, thin, full, big, dark, and bright to name a few. In general, we should endeavor as musicians to create rich, full, dark, and warm sounds as a default. There are definitely times where some other keywords might come into play, but these four terms are a great starting point for most playing.
Now the question is, how do we achieve rich, full, dark, and warm sounds? To play with good tone, you need to study the mechanics of your instrument. For percussionists, this means you need to understand how your arms, wrists, and fingers are working together to control the sticks/mallets and produce sound. Eliminating tension is the number one way to improve tone, whether in the field of percussion or beyond. Train yourself to stop squeezing the sticks! Another focal point should be to move as naturally and organically as possible. This just means to try to replicate hand and arm motions that are natural to how you move outside of music. Examples of this include playing rebounded strokes similar to how you would dribble a basketball, or rotating your single independent strokes like how you would turn a doorknob. Making these connections to your life outside of music leads to more relaxation and less tension, which produces better tone.
A discussion of tone would be incomplete without addressing the area of tuning as well. This topic could be expanded into an entirely separate post, so for now we will just say: tune your instrument to itself, to the room/venue, and to your own ears. Listen to the sounds your instrument produces, and adjust the tuning as necessary to fit your ideal concept of tone. When in doubt, listen to other respected musicians and steal their tuning ideas shamelessly. As you start to find your own sound, you will realize it is a mashup of all of the sounds your mentors and heroes have produced, but it will be unique because of how your individual experiences also shape the sound.
PHRASING

How lyrically can you play?
Musical phrasing refers to the direction you take your musical line. Think of a melody like a road, where the sheet music tells you which notes to play (or where the road takes you), but it does nothing to describe the scenery along the way. That is where your musical phrasing and interpretation comes in. You get to be the tour guide for your audience, highlighting certain aspects of the musical journey, while understating other areas when appropriate.
It is possible to “overdo it” with phrasing. As with tone, it is best to emulate nature whenever possible. For example, instead of quick crescendos and diminuendos that follow the shape of a musical line up and down dramatically, perhaps the music calls for something more subtle, with a longer crescendo that ends with a subtle tapering of the dynamic. Try to take yourself out of the equation when possible, and listen to what might suit the musical line best.
One of the best ways to figure out phrasing is to make some decisions, try some ideas out, and then record yourself playing. Listen with an open mind, and remain unattached to your previous decisions. By taking the time to just listen (as opposed to when you are playing AND listening simultaneously), you will hear the music differently, and be able to make sound judgments as an audience would. Try not to be too hard on yourself, and to remember that music-making is a journey. As long as you can feel the direction of that journey, there is a good chance your audience will feel something, too.
ACCURACY

“Accuracy is the twin brother of honesty; inaccuracy, of dishonesty.” - Nathaniel Hawthorne, American Novelist
A musician that plays with beautiful tone and nuanced phrasing would still be incomplete without devoting significant attention to musical accuracy. Correct rhythm, tempo, pitch, intonation, and articulation are all good places to start. Additionally, while certain liberties can be taken with regard to dynamics, the performer should first plan to emulate the dynamic instructions given in the music, and then make modifications as appropriate.
Developing accuracy starts with slow, deliberate, metronome-based practice. Starting at half-tempo is good, but starting even slower can be useful at times. Use of the metronome and precise placement of each note in time will create an internal foundation of timeliness and rhythm/tempo accuracy. Gradually increasing the tempo on the metronome can take minutes in some instances, or can take days or weeks of practice depending on the complexity of the piece and the experience level of the performer. Patience is key here. Rushing this process leads to missed notes, inaccurate rhythms, and inconsistent tempo. True mastery is first achieved at a slow tempo, and then by taking the time to gradually increase to performance tempo while maintaining all areas of musical accuracy. Again, this process cannot be rushed, so schedule your time appropriately, stay organized, and remain patient. The results are worth the effort!
In summary, musicality really comes down to tone, phrasing, and accuracy. These concepts can be debated and dissected further, but this is undoubtedly a good place to start. I hope this information is useful to you. Please leave a comment if you have any suggestions about what else it takes to play more musically!
Which Sticks and Mallets are Best for Drumline?
Choosing sticks and mallets for your drumline is an important decision. Begin by considering several factors:
Will performers be asked to purchase their own sticks and mallets, or will the ensemble provide the implements?
What is the budget? Have you planned to have extra sticks available throughout the season for when replacements are needed?
Where will you be purchasing from? A local store or an online order?
What are the musical needs of your ensemble? Do you need a variety of different implements for lots of different sounds and textures, or can you get by with the basics?
Once you have started to answer some of these questions, it is time to start shopping.
There are many brands and models of sticks/mallets to choose from. Ideally, you should get your hands on lots of different sticks so you can try them out for yourself before making a final decision. The choice will eventually fall to personal preference. Here are some of my personal favorites:
SNARE DRUM STICKS:


TENOR DRUM STICKS:


BASS DRUM MALLETS:


Let me know in the comments which sticks and mallets you prefer. I hope this list has been helpful!