The Difference Between a Marimba, Xylophone, Vibraphone, and Glockenspiel

Percussionists are responsible for playing so many different instruments. A basic understanding of the differences between them is crucial. Keyboard percussion consists of chromatic, melodic instruments with bars arranged in the same layout as a piano. By reading this guide, you will be able to identify each of the main keyboard percussion instruments and the differences between them.

(If you find this article useful, please consider purchasing some exercises and sheet music from the store!)

Marimba

This is a five-octave marimba.  Notice the wide, wooden bars (brown rectangles on top) and the big resonators (black tubes on bottom).

This is a five-octave marimba. Notice the wide, wooden bars (brown rectangles on top) and the big resonators (black tubes on bottom).

The most distinguishing features of a marimba are it’s wide, wooden bars and it’s big resonators. The bars are usually struck with yarn or corded mallets with a rubber core. A good rule of thumb when selecting marimba mallets is to make sure that the material of the mallet is softer than the wooden bars themselves. One wrong strike with a hard mallet can mean a broken bar that will need to be replaced.

Marimbas come in a variety of sizes. The one pictured above is five octaves (C2 to C7). Most college percussion studios have at least one five-octave marimba, as lots of marimba literature is composed for five-octaves. High school programs generally have 4.3 octave marimbas (A2-C7), which covers most music written for band and orchestra. Marimbas come in other sizes as well.

Xylophone

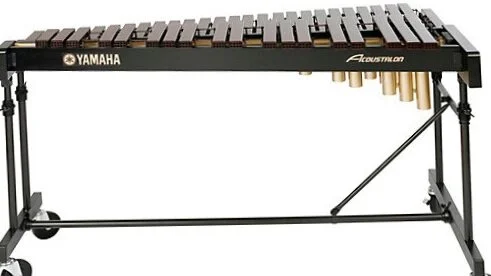
A 3.5 octave xylophone.  Notice the bars are thinner than a marimba, and the resonators are smaller.

A 3.5 octave xylophone. Notice the bars are thinner than a marimba, and the resonators are smaller.

A xylophone is similar to a marimba in that it also has wooden bars. The primary difference would be that a xylophone is smaller in terms of range, bar width, and resonator size. This results in a higher pitched instrument with less resonance (in other words, the bars don’t ring as long after being struck). Xylophones are generally played with harder mallets than would be used on a marimba, but still soft enough as to not damage the wood.

It is worth noting that both marimbas and xylophones can be built with real wooden bars or with synthetic bars. Synthetic bars (as seen in this xylophone picture) approximate the same sound as the real thing, but are less expensive, more durable, and arguably more sustainable.

Vibraphone

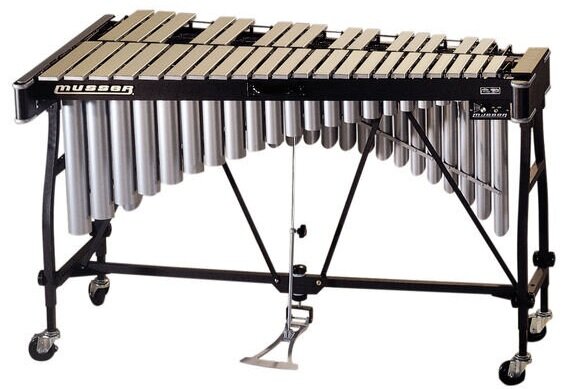
A three-octave vibraphone.  Notice the metal bars and sustain pedal.

A three-octave vibraphone. Notice the metal bars and sustain pedal.

The first difference you will notice that distinguishes a vibraphone is the metal bars. The next thing you might notice would be the sustain pedal at the bottom of the instrument. This pedal, when depressed, allows all of the bars to ring. When the pedal is up, a felt pad presses against the bars from underneath, dampening the sound.

Vibraphones are characterized by their metallic, mellow sound. While marimbas are often played with yarn-wrapped mallets, vibraphonists often use cord-wrapped mallets. However, experimenting with either material on either instrument is encouraged, as long as the player is careful not to damage the equipment with mallets that are too hard.

One of the main new responsibilities for beginning vibraphonists to consider is note duration. Marimba and xylophone players (usually) only need to think about the initiation of their notes. Vibraphonists must also consider which notes they want to ring, which notes should be staccato (short), and everything in between. Phrasing as developed by your pedaling can make or break your sound on a vibraphone.

Glockenspiel (Bells)

A 2.8 octave glockenspiel.  Notice the metal bars and the smaller size.

A 2.8 octave glockenspiel. Notice the metal bars and the smaller size.

The last of the keyboard percussion instruments we will discuss is the glockenspiel. As you can see, the metal bars are similar to the vibraphone. The main difference is that the glockenspiel is in a much higher range than the vibraphone (in this case, F5-D8). Most glockenspiels do not have a sustain pedal, but some do.

It is worth noting that the glockenspiel sounds two octaves higher than written. In other words, if you see a C4 on the page, you will hear C6 when striking the instrument.

Many percussionists start out on a glockenspiel. The skills you learn as a beginner definitely translate to the other keyboard instruments. Spending time playing each instrument is really the best way to get to know how they operate and what makes each one unique.

Thanks for reading this guide! If you have questions or other knowledge to share with readers, please leave a comment below or reach out. Finally, while your here, check out some sheet music in the store!

How to Meet Your Goals

To begin answering this question, consider the following three objectives:

DEFINE YOUR GOAL

“A goal properly set is halfway reached.” —Zig Ziglar

A goal properly set is halfway reached.” —Zig Ziglar

What are you trying to accomplish? Maybe you are trying to learn a new piece, or perhaps you are trying to learn a new technique. A goal such as “just getting better” is not specific enough. Figure out what exactly your goal is, and then you can move on to the next step. Defining your goal might be very simple, or it might take some time. It’s OK to have more than one goal, but it is best if you can narrow those goals down to specific, achievable benchmarks that can be defined. Once you have your goal clearly defined, move on to the next step.


MAKE A PLAN

“Our goals can only be reached through a vehicle of a plan, in which we must fervently believe, and upon which we must vigorously act. There is no other route to success.” —Pablo Picasso

“Our goals can only be reached through a vehicle of a plan, in which we must fervently believe, and upon which we must vigorously act. There is no other route to success.” —Pablo Picasso

“Backwards Planning” is the best way to create an effective plan with the end goal in mind. For example, if you are trying to learn a piece to perform at a recital, start with the recital date. Determine other target dates to use as checkpoints along the way. Here is an example:

  • April 15 - Recital

  • April 1 - Perform for small group of friends/family

  • March 15 - Record yourself playing the entire piece

  • March 1 - Entire piece learned (at tempo)

  • February 15 - Entire piece learned (75% tempo)

  • February 1 - Second half of piece learned (50% tempo)

  • January 15 - First half of piece learned (50% tempo)

  • January 1 - Start

Notice how this plan is in reverse chronological order, meaning that we are keeping the end goal in mind as we create each checkpoint. This creates a sense of urgency (but not panic) all the way back in January 1, and more importantly, it provides focus along the way. Depending on the individual, a more specific plan may be called for. For our example above, maybe each day has a specific number of measures to learn. Here is a detailed breakdown for a piece that is 90-100 measures:

  • January 15 - First half of piece learned (50% tempo)

  • January 12 - Measures 30-40 learned (50% tempo)

  • January 9 - measures 20-30 learned (50% tempo)

  • January 6 - Measures 10-20 learned (50% tempo)

  • January 3 - Measures 1-10 learned (50% tempo)

  • January 1 - Start

Here, the “mini goal” (in this case, on January 15) is at the top of the list, and everything that follows is divided up to support that main goal. Taking the time to properly plan can keep you honest and on track towards meeting your end goal!


JUST DO IT

“The most dangerous distractions are the ones you love, but that don’t love you back.” — Warren Buffet

“The most dangerous distractions are the ones you love, but that don’t love you back.” — Warren Buffet

You’ve set your goal and made your plan. Now it’s time to just get it done. Get to work!

Stuff happens. Distractions get in the way. If you fall behind, you might get discouraged. Just remember that your plan has allowed for some flexibility, and while (in our example) the recital date might be non-negotiable, the other dates leading up to it are adjustable. In other words, if you fall behind in the beginning of February, you can catch up in the next two weeks. Stay after it.

Just remember that this can be the most challenging part. For some people, having a plan and sticking to it comes naturally. Others just don’t function that way. Regardless of who you are, it is worth setting goals, making plans, and working to accomplish them. Don’t get discouraged if things don’t go perfectly all the time; remember that every failure is a chance to learn and grow. Stay motivated, do your best to stay on track, and you will accomplish everything you set out to achieve.

How to Play More Musically

Teachers and instructors often tell their students to play “more musically,” but they do not always explain what that means exactly. Here are some concepts to focus on that can shed some light on this issue.


TONE

What does your instrument really sound like?

What does your instrument really sound like?

Tone is one of the most important aspects of music-making, and it refers to the quality of your sound. No matter what instrument you are playing, you can think of examples where someone playing it just sounded “bad.” Maybe they played all of the correct notes, and even used shaping and dynamics… but the experience of listening to them play was just not enjoyable.

We use lots of words to describe tone: warm, dry, rich, thin, full, big, dark, and bright to name a few. In general, we should endeavor as musicians to create rich, full, dark, and warm sounds as a default. There are definitely times where some other keywords might come into play, but these four terms are a great starting point for most playing.

Now the question is, how do we achieve rich, full, dark, and warm sounds? To play with good tone, you need to study the mechanics of your instrument. For percussionists, this means you need to understand how your arms, wrists, and fingers are working together to control the sticks/mallets and produce sound. Eliminating tension is the number one way to improve tone, whether in the field of percussion or beyond. Train yourself to stop squeezing the sticks! Another focal point should be to move as naturally and organically as possible. This just means to try to replicate hand and arm motions that are natural to how you move outside of music. Examples of this include playing rebounded strokes similar to how you would dribble a basketball, or rotating your single independent strokes like how you would turn a doorknob. Making these connections to your life outside of music leads to more relaxation and less tension, which produces better tone.

A discussion of tone would be incomplete without addressing the area of tuning as well. This topic could be expanded into an entirely separate post, so for now we will just say: tune your instrument to itself, to the room/venue, and to your own ears. Listen to the sounds your instrument produces, and adjust the tuning as necessary to fit your ideal concept of tone. When in doubt, listen to other respected musicians and steal their tuning ideas shamelessly. As you start to find your own sound, you will realize it is a mashup of all of the sounds your mentors and heroes have produced, but it will be unique because of how your individual experiences also shape the sound.


PHRASING

How lyrically can you play?

How lyrically can you play?

Musical phrasing refers to the direction you take your musical line. Think of a melody like a road, where the sheet music tells you which notes to play (or where the road takes you), but it does nothing to describe the scenery along the way. That is where your musical phrasing and interpretation comes in. You get to be the tour guide for your audience, highlighting certain aspects of the musical journey, while understating other areas when appropriate.

It is possible to “overdo it” with phrasing. As with tone, it is best to emulate nature whenever possible. For example, instead of quick crescendos and diminuendos that follow the shape of a musical line up and down dramatically, perhaps the music calls for something more subtle, with a longer crescendo that ends with a subtle tapering of the dynamic. Try to take yourself out of the equation when possible, and listen to what might suit the musical line best.

One of the best ways to figure out phrasing is to make some decisions, try some ideas out, and then record yourself playing. Listen with an open mind, and remain unattached to your previous decisions. By taking the time to just listen (as opposed to when you are playing AND listening simultaneously), you will hear the music differently, and be able to make sound judgments as an audience would. Try not to be too hard on yourself, and to remember that music-making is a journey. As long as you can feel the direction of that journey, there is a good chance your audience will feel something, too.


ACCURACY

“Accuracy is the twin brother of honesty; inaccuracy, of dishonesty.” - Nathaniel Hawthorne, American Novelist

“Accuracy is the twin brother of honesty; inaccuracy, of dishonesty.” - Nathaniel Hawthorne, American Novelist

A musician that plays with beautiful tone and nuanced phrasing would still be incomplete without devoting significant attention to musical accuracy. Correct rhythm, tempo, pitch, intonation, and articulation are all good places to start. Additionally, while certain liberties can be taken with regard to dynamics, the performer should first plan to emulate the dynamic instructions given in the music, and then make modifications as appropriate.

Developing accuracy starts with slow, deliberate, metronome-based practice. Starting at half-tempo is good, but starting even slower can be useful at times. Use of the metronome and precise placement of each note in time will create an internal foundation of timeliness and rhythm/tempo accuracy. Gradually increasing the tempo on the metronome can take minutes in some instances, or can take days or weeks of practice depending on the complexity of the piece and the experience level of the performer. Patience is key here. Rushing this process leads to missed notes, inaccurate rhythms, and inconsistent tempo. True mastery is first achieved at a slow tempo, and then by taking the time to gradually increase to performance tempo while maintaining all areas of musical accuracy. Again, this process cannot be rushed, so schedule your time appropriately, stay organized, and remain patient. The results are worth the effort!


In summary, musicality really comes down to tone, phrasing, and accuracy. These concepts can be debated and dissected further, but this is undoubtedly a good place to start. I hope this information is useful to you. Please leave a comment if you have any suggestions about what else it takes to play more musically!